LinkedIn’s Sales Navigator is a powerful tool for generating leads. But many people don’t know how to use it effectively.
In this blog post, I’m going to show you how to use LinkedIn Sales Navigator to generate leads and lots of cash for your business. Stay tuned!
Here is what we will go over today in this Post:
1. What is Linked In Sales Navigator and what are its features
2. How to create a lead list
3. How to turn leads into contacts
4. Nurture the Relationship
1. What is Linked In Sales Navigator and what are its features?
LinkedIn Sales Navigator was created to help you generate more leads, shorten your sales cycle, and close more deals. It offers some amazing tools that will do so for your business. Some of these key features include:
· The Sales Navigator “Who’s Viewed Your Profile” Report
· Advanced Search – You can find almost anyone. You can even find people who have recently visited a competitor’s company profile!
· Analytics – See how many views you’re getting on your profile, where those views are coming from, and how many leads you’re generating.
· Lead Gen Forms – You can create forms that ask visitors to provide their contact information in exchange for access to exclusive content related to your industry, company news, etc. These forms can be designed to fit into several different areas on your profile page.
· Lead Gen Emails – You can send emails to people that visit your profile, attend your events or read your blog posts.
· Groups – This function has been around for a while and it’s still useful. Join groups related to your industry and engage with them by leaving comments. LinkedIn will pick up on the fact that you’re an expert on a particular subject and will start recommending these groups to your network.
· Answers – Answer questions related to your industry or topics relevant to your business. You can ask their own questions as well and engage with people who answer them.
· Showcase Pages – This is by far one of the most powerful features of Sales Navigator. It enables you to create a page on LinkedIn that shows off your brand and establishes thought leadership in your industry.
2. How To Create A Lead List

First, go to your homepage and click on “Sales Navigator.” You can also get there by clicking on the “Profile” button at the top of the page and clicking on “Sales Navigator” in the drop-down menu.
Once you’re in Sales Navigator, click on “Leads” and then choose to either generate a list or join one already created by your company. You can create a list based on several different criteria such as:
· Job title – Enter titles of people who might be interested in your product/service and you can create a list based on their job titles.
· Company – You can enter the name of companies or organizations and Sales Navigator will generate a list for you based on that information.
· Alumni – If you’re offering services to alumni of a particular school, you can create a “School Alumni” list and add the name of the school.
· Job Function – This is another useful list-builder function. Depending on your industry/niche, job functions might include things like Sales, Marketing, HR, etc.
You can also create lists based on your own custom criteria. For example, if you want to find people who live in Oakville, Ontario, you can select that criteria, and Sales Navigator will generate a list for you.
Once you’ve created the list of people you’re interested in connecting with, click “View Leads.” You’ll be brought to a page that will show you a list of leads.
3. How to Turn Leads To Contacts.
Now it’s time to start engaging with these leads and converting them into contacts in your system. Sales Navigator offers some great tools for doing so, but they work best if you use them in conjunction with an outside CRM or sales platform such as HubSpot CRM.
The first tool you can use is “Lead Gen Forms.” Below is an example of Lead Gen Forms that are available on the site:
“Contact Me” – This is a great tool to use when you want to generate leads for an event, webinar, or other promotion where people can choose to contact you directly.
“Lead Gen Cards.” – This nifty little feature allows you to place an opt-in form in your email signature that others can then click to subscribe to your newsletter, download a piece of content, or request more information from you.
4. Nurture the Relationship.

Once you have a lead in your system it’s important to invite them to connect with you on LinkedIn so that they’re easily discoverable and accessible by you.
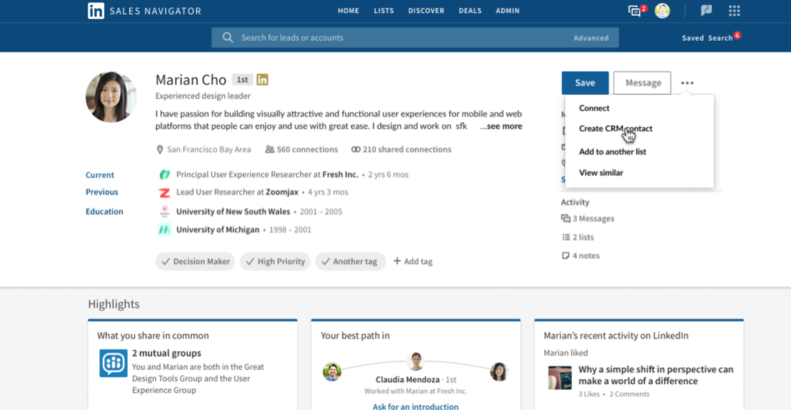
As mentioned above, Sales Navigator shows complete profiles of leads right on the screen which makes it easy to determine whether or not you want to connect with them and provides a simple way for you to send your connection request.
Once someone clicks on your name and accepts your invitation, they show up in the Leads section of Sales Navigator under “Connections.”
If you click on that link, you’ll be taken to a page that shows all your connections. It’s important to remember that there are different levels of connection within LinkedIn.
For example, someone may accept your invitation to connect on LinkedIn, but not share their email address with you so you still won’t have full access to the information in their profile.
Once you have a list of people in your system and they’ve accepted your connection invite, it’s important to develop a strategy for engaging with them.
This is the final step in the LinkedIn lead generation process – having a systematic way of connecting with your audience and turning them from leads to customers and from customers to sales.
In order to do this successfully, you’ll need to have a strategy in place that allows you to nurture your leads over time.
This could mean setting up email drip campaigns, sending them pieces of content they’re interested in, or developing an automated process for sharing valuable posts on social media sites like LinkedIn, Twitter, and Facebook.
For email, you will want to use something such as mail chimp or convert kit.
For tips on email marketing, you can see a previous post on we did on writing killer email campaigns.
Just remember, the most important thing is being genuine. At the end of the day, you’re trying to add real value and communicate in a way that will enrich your customer’s lives.
I can’t tell you how many times I am sent generic templates with no value that are asking me for something. Those never work. Stop wasting your time!
In addition, don’t just try to sell them something automatically or turn them into a source of revenue immediately. Instead, take your time and build an ongoing relationship with them so they know what they can expect from you and become loyal to your brand.
Once you have this process in place and it’s working efficiently, the last step is to scale!
The great thing about doing lead generation through LinkedIn is that all of these processes can be automated and scaled across a huge number of people simultaneously.
Using an email marketing tool like mail chimp or convertkit makes it easy to set up drip campaigns, Sales Navigator makes it easy to import leads into your system, and sharing content over social media is made simple by tools like CoSchedule.
The main thing to remember when scaling lead generation activities on LinkedIn is that you’re not just looking for high volume.
Since the whole process revolves around building an ongoing relationship, you’ll want to ensure that each lead you generate is nurtured to the point that they’re ready to become a customer.
Don’t build superficial or shallow relationships. That never leads to trust. Trust is what sells.
Once you have all of these pieces in place you’ll be set up for LinkedIn Lead Generation success! Now, it’s time to start generating your first round of leads and converting them into customers.
Happy Hunting!
Want more in-depth tips to scale your business fast and profitably? Smash that subscribe button below!